One of the most commonly used machines in my workshop is the bandsaw. It is such a versatile machine that can do everything from ripping stock to cutting intricate curves. Just a few months back, I was doing a lot of work with the bandsaw and I broke 3 blades within a week.
As much as I was frustrated, I realized I had put the blades through a lot so I decided to do some research to find out why does my bandsaw blade keep breaking?
Bandsaw blades will break if you force timber into it, apply too much or too little tension, use the wrong type of blade for the cut, the blade tooth pitch is incorrect, the blade is installed incorrectly, the thrust bearings are not adjusted, the blade is blunt, the blade has a faulty weld, you are cutting too tight a curve or you are not using the correct run in sequence.
These reasons above are the main causes as to why a bandsaw blade will break every time. I found that as these issues are rectified, my blade broke less often or not at all. Here is the list for easy reference.
- Forcing the material into the blade
- Too much tension on the blade or too little
- Using the wrong type of blade for the cut
- The blade has an incorrect tooth pitch
- The blade was installed incorrectly
- The Thrust bearings are not adjusted correctly
- Using a dull or blunt blade
- Faulty weld or poor-quality blade
- Cutting too tight a curve
- Not using the correct run-in sequence
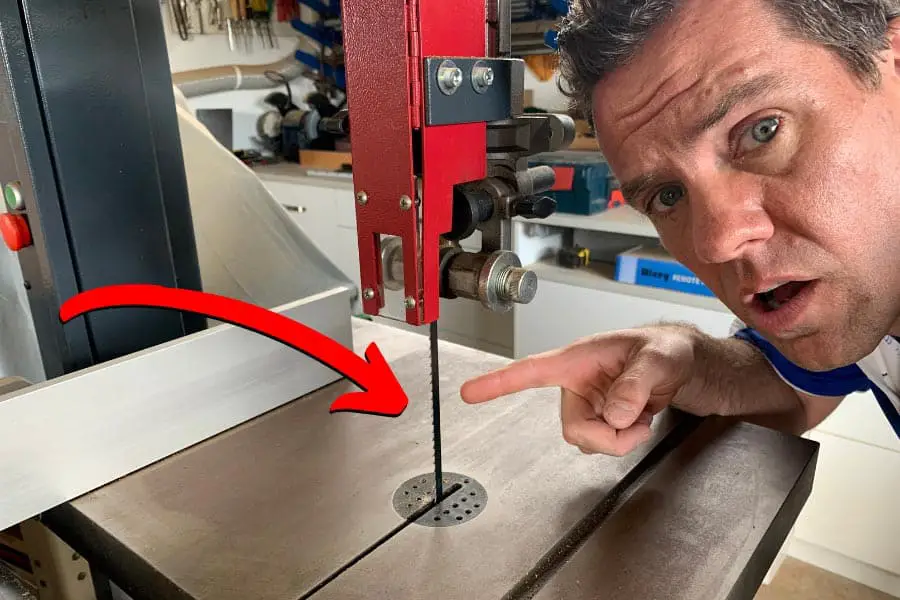
Let me explain each of these in more detail so you can get your bandsaw back up and running with fewer broken blades.
1. Are You Forcing The Timber Into The Blade?
Sometimes it is easy to get carried away cutting at the bandsaw and we all start to really push the timber through the blade. It is important to let the blade do the cutting and not force your material into it.
When you place excessive force on the blade, this creates excessive heat which is usually the number one cause of broken blades. You may notice that a lot of things I discuss in this article can relate to excess heat.
Excess heat is generated from the teeth not being able to remove the sawdust quickly enough and it creates friction between the blade and the timber.
Excess heat can also be caused by the back of the blade rubbing hard against the thrust bearings or guide bearings. I go deeper into the thrust bearings further down.
As you can see, excess heat can be your enemy and over time will lead to the blade breaking. As a guide, after making several cuts, you should be able to stop your bandsaw (and unplug it) and touch your blade and it should only be very slightly warm. This is a good sign that you are doing everything right.
2. Is The Bandsaw Blade Tensioned Correctly?
This is probably the most misunderstood yet most common cause of broken blades. I can appreciate that a blade with more tension is much better than one that is too loose.
Tensioning your blade correctly is a very important step when putting in your new blade. If you over tension a blade, this can cause the welded joint to break, cracks can appear in the gullets of teeth or cracking can appear along the back edge of the blade.
These cracks are usually very fine and hard to spot. Over time, these cracks will develop and become worse, and eventually, your blade will break.
Just as over tensioning is a big problem, a lack of tension can also be the cause of breakages. A blade that is loose or under tension will simply get caught up in the timber and jamb and break.
With so many issues coming from tensioning, how do you tension a bandsaw blade correctly?
How To Correctly Tension Your Bandsaw Blade
There are few different methods around for tensioning bandsaw blades and I will show you a couple that has worked for me. Taking a little extra time here to get your blade tensioned correctly can save you many headaches later on.
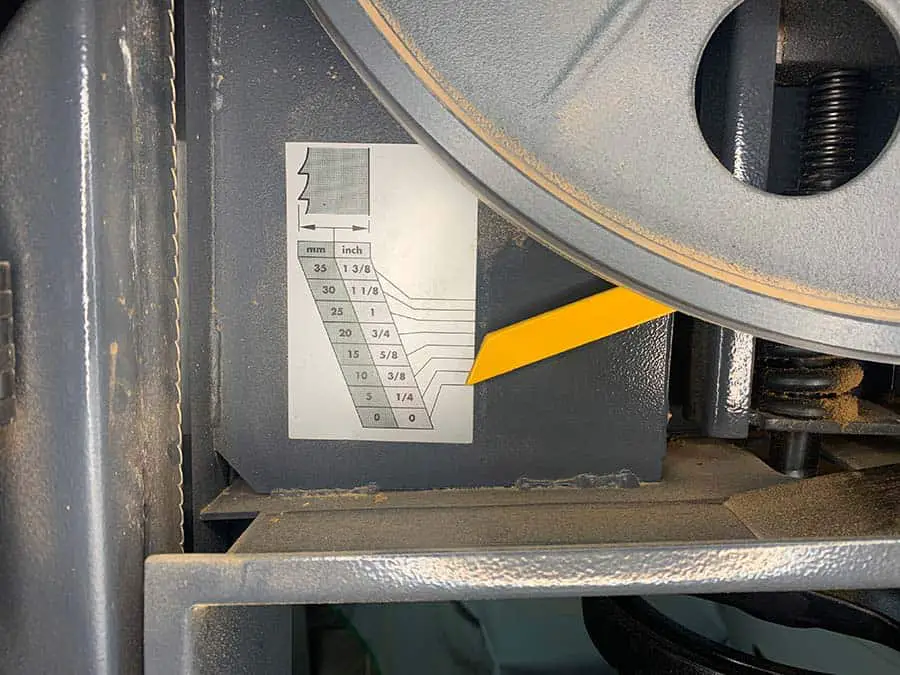
Most bandsaws available today, have a gauge on them to show you how much tension to use. I have a photo below of what this gauge looks like on my bandsaw, but these gauges should be taken as a good guide as they are a little inaccurate. You can use it for an initial tension only.
What Is The Right Tension?
Most blade manufacturers recommend 15,000 psi to 20,000 psi for most common carbon steel blades. There are other blades that require much more tension up to around 30,000 psi.
I know this seems like an awful lot but bandsaw blades require such high tension as it gives them beam strength enabling them to become more rigid and less tendency to deflect.
How do you test your own bandsaw? I will give you 2 easy to follow practical examples. You could go out and buy a proper tensioning device but these are an unnecessary expense. These 2 examples are most commonly used and work fine for most operations.
The Deflection Method
These are the steps to carry out the deflection method to get the right tension of your bandsaw blade:
- Turn off and unplug your bandsaw
- Raise the blade guides fully up
- Tension the blade a little to start
- Place a square or ruler on the table and line a number up with the back of the blade
- Push the blade sideways with your finger using moderate pressure.
- The blade should only deflect sideways between 1/8 – 1/4″ (3-6mm)
- Turn the tensioning know another 1/4 turn after that
- Try doing a cut. If you are resawing some think timber, take notice to see if the blades have deflected or wandered in the cut. If so, give it another 1/4 turn.
The Flutter Method
This method is also very simple and my youtube video below may help explain it better:
- Tension your blade a little
- Start you bandsaw
- Watch the front of the blade as it spins
- While watching the blade, start turning the tensioning knob to release some tension.
- Keep turning until you start to see the blade flutter from side to side as it spins
- Stop turning the knob
- Now while watching the blade again, start to tension the blade up
- As you tension you will notice the flutter fading away
- Keep tensioning until the blade runs perfectly straight
- Then give the knob another 1/4 of a turn
Both of these tensioning methods are easy to do and usually will give you sufficient tension on any size blade. Once you have tensioned the blade, do a series of cuts and test it out. You can always give it more tension.
IMPORTANT! Take Off The Tension When You Are Done
This step will probably make your blade last twice as long as it normally would.
When you are finished using your bandsaw, it is very important to take the tension off the blade. This does 3 things:
- It prevents your blade from stretching over time which can lead to breakages
- It relives the spring on our bandsaws tensioner
- It prevents flat spots from forming on the rubber tires if the bandsaw was not going to be used over a few months
If you were going to use your bandsaw the following day, then there would be no need to de-tension it.
3. Are You Using The Wrong Type of Blade For The Cut?
When using a bandsaw you should always check you are using the right type of blade for the type of cut you wish to perform. Using the wrong blade will result in more blade breakages.
An example of this would be trying to cut a tight radius with a wider blade. The back of the blade will continually jamb in the timber. This will cause an excessive heat build-up and the blade will eventually break.
On the other hand, if you want to rip (known as resawing) some wide timber down to thickness, you should be using a resaw blade or one that is a least 20mm wide. A narrow blade will not have enough strength and will break very quickly.
There are many other types of blades such as carbon steel, bi-metal, etc and these all have their own special uses. I will discuss these blade types in another article.
As you can see, taking a few more minutes to select the right blade will be well worth your while. Lets face it, a broken blade will be more frustrating!
4. Does Your Bandsaw Blade Have The Correct Tooth Pitch?
Tooth Pitch refers to the number of teeth per inch (25mm) of the blade. Most bandsaw blades range from 4 – 24 teeth per inch. So why is this important?
The general rule of cutting with a bandsaw is you should always have at least three (3) full teeth in the timber/cut at any one time.
If you have more or fewer teeth than 3 in the cut at one time, the blade may snag and catch in the cut and break.
I have prepared a small table below which will help you decide on the correct tooth pitch for the thickness of timber you are cutting.
| Thickness Of Timber | Number of Teeth Per Inch |
| Up to 5/16″ (8mm) | 24-32 |
| 5/32″ – 1/2″ (4-13mm) | 24 |
| 7/32″ – 5/8″ (6-16mm) | 18 |
| 1/4″ – 7/8″ (6-22mm) | 14 |
| 3/8″ – 1 1/4″ (9.5-35mm) | 10 |
| 1/2″ – 1 1/2″ (13-40mm) | 8 |
| 1″ – 2″ (25-50mm) | 6 |
| 1 1/2″ – 3″ (38-75mm) | 4 |
| 2″ – 4 ” (50-100mm) | 3 |
| 3″ – 6″ (75-100mm) | 2 |
| 4 1/2″ – 9″ (114-225mm) | 1 1/4 |
| 8″ and over (200mm +) | 3/4 |
5. How To Install A Bandsaw Blade Correctly
If you want to find out why your bandsaw blade breaks, there are a few things you need to check first. If you install your blade correctly from the start, you will be surprised how much easier using a bandsaw becomes.
Before I go over those steps, let’s first discuss where a blade should sit on the wheels.
A Bandsaw blade has to sit in the center of the crown of the rubber tires of your bandsaw. In fact, the back of the teeth gullets needs to be centered with the center of the bandsaw wheel as that is where the tension is required.
Let’s look it into this a little more. After years of using a bandsaw and listening to all the experts and reading books on bandsaws, I will try to explain this as best as I can.
What Is A Crown On A Bandsaw Wheel?
All bandsaw wheels have a rubber tire around them which is crowned up in the center. This is how the blade stays on the wheel while it is spinning.
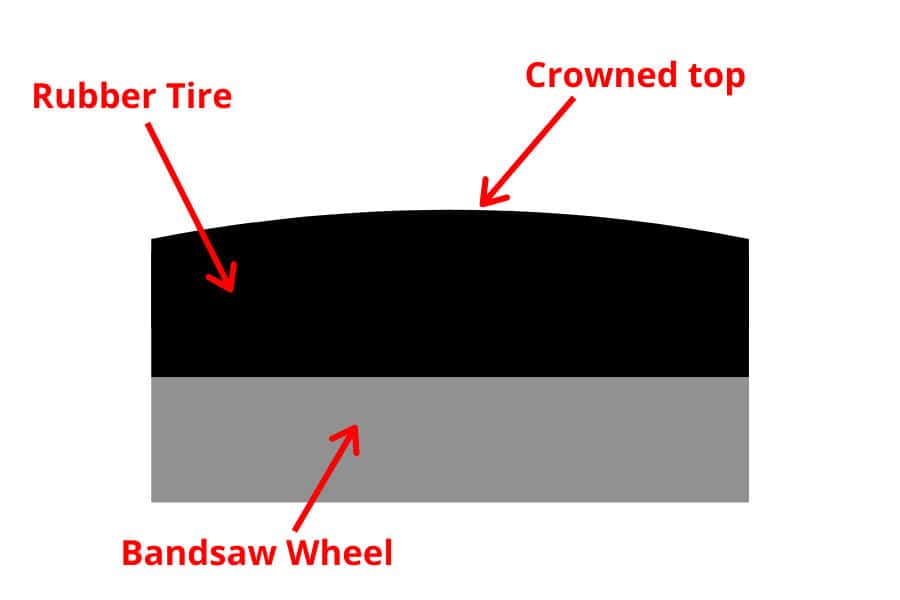
When a bandsaw blade cuts, the pressure on the blade to wander comes from the teeth making the cut. This is why it’s vital that the teeth on the blade are placed slightly forward of the crown as pictured below.
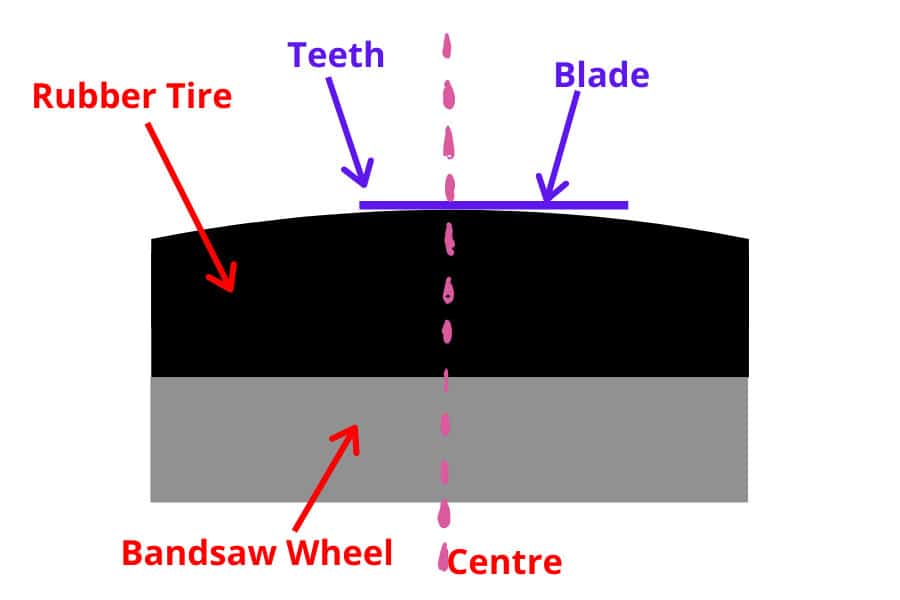
This blade positioning also prevents excessive wear on the rubber from the set on the side of the teeth. In some wider blades or smaller bandsaws, it is difficult to get the blade that far back but you can position the center of the blade over the crown in this instance.
Now that you understand where the blade should sit on the wheels, let’s go over the proper procedure to install a bandsaw blade.
Step-by-Step Installation Guide
These are the steps you should take when installing a new blade in your bandsaw.
- Firstly unplug the machine from the power
- Open the covers and remove the old blade
- Use a cloth to clean the rubber tires to remove any residue buildup
- Loosen off all guides and thrust bearings
- Put in your new blade and position the teeth of the blade just slightly forward of the crown as discussed above.
- Apply a small amount of tension to the blade
- Use your finger to turn the top wheel a few times to ensure the blade is tracking in the correct spot
- Apply a little more tension to the blade
- Continue to spin the top wheel and adjust it until you are happy the blade is running on the correct spot on the tire
- Make sure the blade is not rubbing on any internal part of the bandsaw
- Apply the proper amount of tension using one of the methods described earlier in this article
- Now that the blade is positioned correctly, adjust the blade guides so that they sit directly behind the teeth gullets and are about 0.5mm away from the sides of the blade
- When you turn the wheel, you should not hear any rubbing from the guides
- Adjust the thrust bearings to the back of the blade. This will be covered in more detail in the next paragraph
- If you are happy with how the blade is tracking and where the guides are sitting, you are good to close the covers and start cutting!
6. How To Set The Thrust Bearings On A Bandsaw
The thrust bearings sit behind the back of the blade and are what support the blade from moving backward during a cut. If these bearings are not set or working correctly, they can lead to blade breakages.
Thrust bearings need to be adjusted so that they are 1mm away from the back edge of the blade after the blade has been installed correctly. Turn the wheel by hand several times to ensure the thrust bearings are not rubbing on the back of the blade.
Every bandsaw has 2 of these and one is located above the table on the column and the other is located beneath the table. Make sure both thrust bearings turn freely and are not seized.
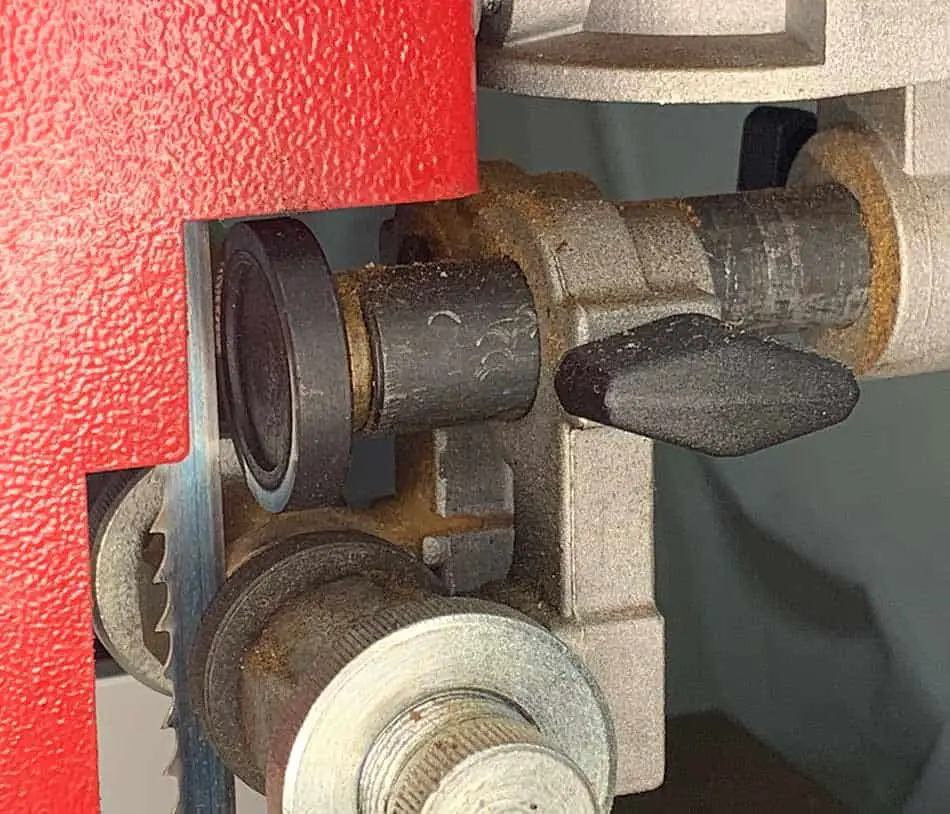
During a cut, your blade will contact these bearings and these are what prevents the blade from being pushed off alignment. If the thrust bearings are not set correctly, your blade could bend uncontrollably in the cut or even worse, come off the wheels while running.
Both of these circumstances will lead to the blade breaking. If your thrust bearings are seized and don’t turn freely, your blade will continuously rub on them causing friction and heat build-up.
Heat build-up is also a major contributing factor to your blade breaking.
As well as the thrust bearings, make sure you adjust the guide bearings for every new blade. Each bandsaw has 4 of these. Two are located at the top, on the column and the other two are below the table.
The guide bearings should sit just behind the teeth gullets and need to be very close but not touching the blade on either side. These guides bearings play an important role in preventing the blade from moving side to side.
7. Problems With Using A Blunt Bandsaw Blade
A dull or blunt bandsaw blade is not just awful to cut with, but it can cause your blade to break. How do you ask?
When your blade gets blunt, we all tend to start forcing the timber through the cut. Because the teeth are not cleanly cutting, they rub on the timber and this causes friction and a build-up of heat.
After a time, this excess heat will break your blade, especially when you try to cut curves.
Blunt blades also tend to have less “set” on them. The set on a blade refers to the distance each tooth is bent away from the blade. Each tooth alternates left and right to allow clearance for the blade to pass through the cut.
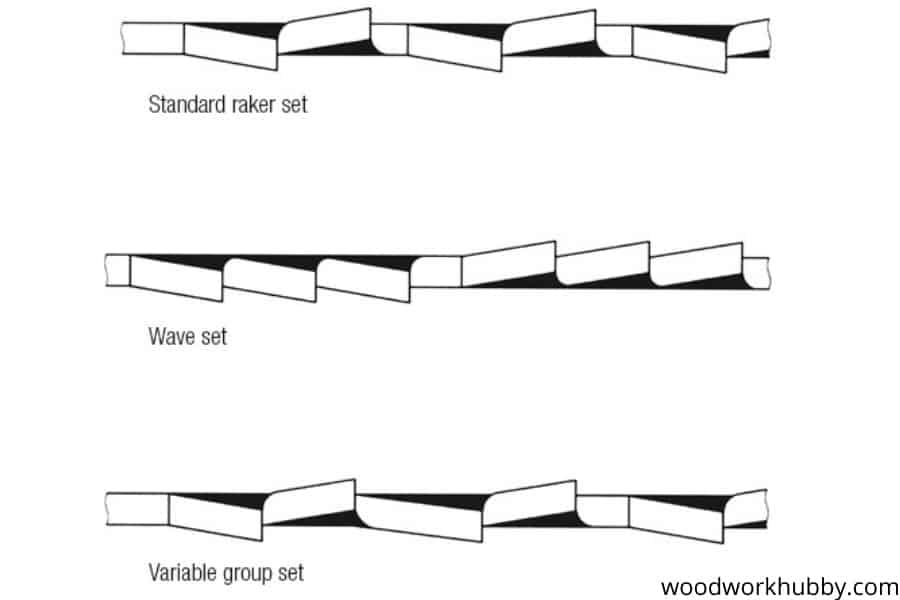
Insufficient set on the blade will cause friction between the blade and the timber which also leads to breakages. I recommend getting a new blade or getting your old one sharpened as soon as you find it hard to push timber through the cut.
8. Are You Using A Faulty Blade?
If you have gone through all of these items to see why your blade has broken and you are still not sure, it is possible you have a faulty blade or faulty weld on the blade.
Bandsaw blades mostly break at the weak spot on the blade which is where it is joined at the weld. It is possible the weld was not sufficient.
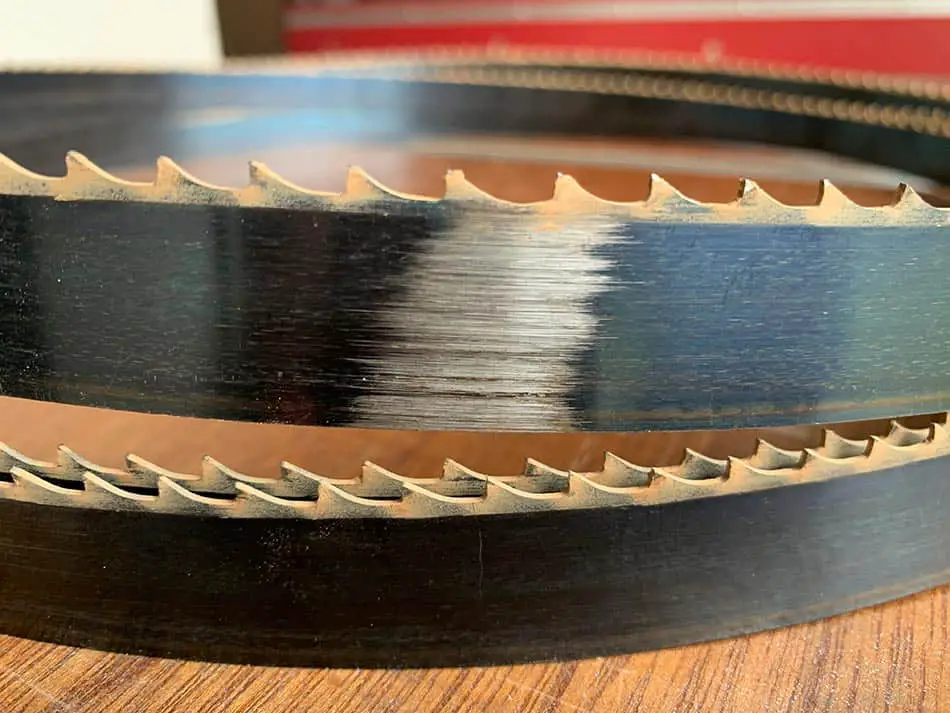
If the blade broke somewhere else, you may also just have gotten unlucky and have a faulty blade.
Go through all of the steps in this post to make sure you have set it up right. If you are sure you have, you may be able to get a replacement or refund from the place you got it from.
9. Can You Cut Tight Curves On A Bandsaw Without The Blade Breaking?
One of the most common causes of bandsaw blade breakages is trying to cut a very tight radius with the wrong blade.
A bandsaw can cut very tight corners as long as you are using an appropriate blade width and the blade is tensioned correctly.
Bandsaw blades come in a variety of different widths. In general, the narrow blades will cut very tight curves will wider blades are designed for straight cuts.
The width of a bandsaw blade is measured from the back edge to the very tip of the teeth. Have you ever tried to cut straight with a narrow blade? If so you will find the blade waves along the cut.
I have put together this quick reference table based on my experiences to show which blade to use for which radius of cut.
| Cut Radius Required | Width Of Blade Needed |
| 3mm (1/8″) | 3mm (1/8″) |
| 8mm (5/16″) | 5mm (3/16″) |
| 15mm (5/8″) | 6mm (1/4″) |
| 40mm (1 1/2″) | 10mm (3/8″) |
| 65mm (2 1/2″) | 13mm (1/2″) |
| 100mm (4″) | 16mm (5/8″) |
| 140mm (5 1/2″) | 19mm (3/4″) |
| 175mm (7″) | 25mm (1″) |
As you can see from the above table, a narrow blade of around 3mm can cut a very tight radius and almost a 90-degree corner. When using such small blades, you will need to let the blade do the work and don’t try to force it.
Cuts with very small radii cut snap your blade quickly if you not paying attention. You will know if your blade is too wide for the cut when the back edge starts to bind inside of the cut and you will find it difficult to move the blade around.
As a general rule and to play on the safe side, always use a blade that is narrower than required for the curve.
10. Bandsaw Blades Require A Run In Before Using Them
This is one thing that is not well known but is a very important step to ensure the longevity of your bandsaw blade.
I recommend running a few small cuts through softwood to ensure everything is running correctly. Then turn off the machine and check the blade tracking and tension is still where it should be.
At this point, you can go ahead and start cutting your real timber. The point of a run-in is to check adjustments and make sure the blade is cutting as it should. This is also the best chance to make sure the blade is not hitting on any part of the saw and all the guide bearings are working fine.
If everything is fine with your blade during this run-in, then it’s likely it will last a long time with proper care and maintenance.
Why Does My Bandsaw Blade Keep Coming Off?
A bandsaw blade will continually come off the wheels if you have insufficient blade tension or the rubber tires are worn. These are the 2 most common causes which are easily fixed.
- Apply more tension to the blade as I explained above in this article
- Check your rubber tires are not badly worn. If so these need to be replaced before going on.
How Long Should A Bandsaw Blade Last?
This is going to vary a lot from user to user and the amount of work a bandsaw will get. Typically, I see most blades lasting around 12 months will general and moderate use.
Some blades may last years and really depends on the quality of the blade and the type of work you do. Unfortunately, you may sometimes find yourself with a broken blade even though you have done everything right.
Many times the weld on the blade may be weak or faulty and will break for no apparent reason. For this reason, I recommend spending a little more to buy a better-quality blade.
Conclusion
I hope this article was helpful in explaining the most common reasons why your bandsaw blade keeps breaking. I always follow these tips myself and I must say I hardly ever have any broken blades.
I am confident that by following this guide, you will spend more time cutting timber than changing broken blades!

